Learn React – A Handbook for Beginners
The goal of this handbook is to provide gentle step-by-step instructions that will help you learn the key concepts of React. Instead of covering all the theories and concepts of React in their entirety, I'll be teaching you important building blocks of the library. You'll learn about JSX, components, props, states, event handlers, creating forms, and running network requests. By covering these concepts, you'll be equipped to dive further into advanced React topics. To get the full benefit of this handbook, you should have basic knowledge of HTML, CSS, and JavaScript. No previous knowledge about React is needed, as we will start from the very basics. If you need a JavaScript refresher, you can get my JavaScript book here. React is a very popular JavaScript front-end library. It's received lots of love from developers around the world for its simplicityand fast performance. React was initially developed by Facebook as a solution to front end problems they were facing: Why do developers love React? As a software developer myself, I can think of a few reasons why I love it: The bottom line is that with a low learning curve, React gives you incredible power in making your UI flexible, reusable, and spaghetti-free. Learning React opens tremendous opportunities if you want to work as a web developer. To start programming with React, you'll need to have three things: We're going to use the Chrome browser to run our JavaScript code, so if you don't have it, you can download it here. The browser is available for all major operating systems. Once the download is complete, install the browser on your computer. Next, you'll need to install a code editor if you don't already have one. There are several free code editors available on the Internet, such as Sublime Text, Visual Studio Code, and Notepad++. Out of these editors, my favorite is Visual Studio Code, because it's fast and easy to use. Visual Studio Code, or VSCode for short, is an application created for the purpose of writing code. Aside from being free, VSCode is fast and available on all major operating systems. You can download Visual Studio Code here. When you open the link above, there should be a button showing the version compatible with your operating system as shown below: Click the button to download VSCode, and install it on your computer. Now that you have a code editor installed, the next step is to install Node.js Node.js is a JavaScript runtime application that enables you to run JavaScript outside of the browser. You need to install this application on your computer to install packages required in React development. You can download and install Node.js from https://nodejs.org. Pick the recommended LTS version because it has long-term support. The installation process is pretty straightforward. To check if Node has been properly installed, type the command below on your command line (Command Prompt on Windows or Terminal on Mac): The command line should respond with the version of the Node.js you have on your computer. It's time to run your first React application. First, create a folder on your computer that will be used to store all files related to this book. You can name the folder 'beginning_react'. The next step is to open your terminal and run the npm command to create a new React application using Vite. Vite (pronounced 'veet') is a build tool that you can use to bootstrap a new React project. Inside the 'beginning_react' folder, you need to run the following command to create a new React project with Vite: You should see npm asking to install a new package (create-vite) as shown below. Proceed by typing 'y' and pressing Enter: Then Vite will create a new React project named 'my-react-app' as follows: When you're done, follow the next steps you see in the output above. Use the Then, you need to run the Now you can view the running application from the browser, at the designated localhost address: This means you have successfully created your first React app. Congratulations! Now that you've successfully run a React application, let's take a look at the source code generated by Vite to understand how things work. Run the Visual Studio Code you've installed in the previous section, and open the 'my-react-app' folder inside VSCode. Here, you should see several folders and files that make up the React application as follows: The When you run the The The The You don't need to modify any of these files. Instead, let's go to the First, the The The Here, you can see that the ReactDOM library creates a root at the You can open the In this file, a single component named This file is where we will be exploring the fundamentals of React. Let's delete everything in this file, and write a simple Next, delete the If you open the browser again, you should see a single heading rendered as follows: Alright! Now you're ready to learn the fundamentals of React. We'll start your first lesson in the next chapter. In React, a component is a single independent unit of a user interface (UI). What you write inside a component will determine what should appear on the browser screen at a given time. In the previous chapter, we created an A component is made up of a function that returns a single UI element. When you want a component to render nothing, you can return a All React components are saved under the What is JSX? It's an extension of JavaScript that produces JavaScript-powered HTML elements. We're going to learn about it later. A component must always return a single element. When you need to return multiple elements, you need to wrap all of them in a single element like a But this will make your application render one extra The empty tag above is a React feature called a Fragment. By using a Fragment, your component won't render an extra element to the screen. You can also import the But you don't need to explicitly state the To render a React component into the browser, you need to create a root React component using the ReactDOM library, which you've seen previously when viewing the You need to have an HTML file as the source from which your React component is rendered. Usually, a very basic HTML document with a Next, you render the component into the Notice how ReactDOM is imported from Here, you can see that the But it's confusing to have multiple components in one file, so let's not do this. Writing in React components is similar to how you comment in regular JavaScript code. You can use the double forward slash syntax The following example shows how to comment the When you want to comment the code inside the It may seem very annoying that you need to remember two different ways of commenting when writing React applications. But don't worry, because a modern tool like VSCode knows how to generate the right comment syntax. You only need to press the comment shortcut, which is Up until this point, you've only rendered a single Composing componentsis the process of forming the user interface by using loosely coupled components. It's kind of like making a house out of Lego blocks, as I will show you in the following example: From the example above, you can see how the The composition of many components will form a single tree of React components in a top-down approach. The tree will then be rendered into the DOM through the By composing multiple components, you can split the user interface into independent, reusable pieces, and develop each piece in isolation. In the previous chapter, you learned that a component must always have a The tag JSX is a syntax extension that produces JavaScript powered HTML elements. It can be assigned to JavaScript variables and can be returned from function calls. For example: Because of JSX, you can also embed JavaScript expressions inside an element by using curly brackets This is what makes React elements different from HTML elements. You can't embed JavaScript directly by using curly braces in HTML. Instead of creating a whole new templating language, you just need to use JavaScript functions to control what is being displayed on the screen. For example, let's say you have an array of users that you'd like to show: You can use the Inside React, you don't need to store the return value of the While the above code is already complete, React will trigger an error in the console, saying that you need to put a "key" prop in each child of a list (the element that you return from A prop (short for property) is an input that you can pass to a component when rendering that component. The You won't use it actively in any part of your array rendering code, but React will ask for one when you render a list. It is recommended that you put the unique identifier of your data as the key value. In the example above, you can use the When you don't have any unique identifiers for your list, you can use the array Props are one of the ingredients that make a React component powerful. You're going to learn more about it in the next chapter. You can add the The keyword Props and states are used to pass data inside React components. Props (or properties) are inputs passed down from a parent component to its child component. On the other hand, states are variables defined and managed inside the components. Let's start by understanding props. Suppose you have a You can pass a prop from In the code below, the When the component is rendered on the browser, the You can access the The You can pass as many props as you want into a single child component. Just add the props when using the component as shown below: All the props above will be passed to the ChildComponent's You can even pass a function into props like this: In the child component, you can call the function as follows: Note that if you pass anything other than a string as a prop value, you need to put the value in curly brackets (numbers, functions, arrays, objects, and so on) This is because JavaScript expressions can't be processed by JSX unless you put the expression inside curly brackets. Immutable means that a prop's value can't be changed no matter what happens. In the code below, the But you'll get an error in the console as follows: As you can see, React props can't be changed once you declare them. But what if your data needs to change as a user interacts with your application? This is where state comes to the rescue. In React, states are arbitrary data that you can declare and manage in your components. To create a state in React, you need to call the In React, hooks are functions that allow you to tap into the features provided by React. The When calling the The first element holds the state value, and the second element is a function that allows you to change the state value. You need to use the destructuring array syntax to receive both elements as shown above You can give any names to the variables returned by To render the state value, you can embed it into JSX as follows: If you want to change the value of the But you can't call Instead, you can create a button that will change the value of name when you click it: In the code above, we create a Inside the prop, we pass a function that simply calls the You can pass the state into any child component. When you need to update the state from a child component, you need to pass the Here's an example of passing a state from In the When the button on the To help ease your development, you can install the React Developer Tools (DevTools for short) to inspect the current state and props value of your components. You can install React DevTool for Chrome here. Once installed, open the developer tool and you should have two extra tabs called Componentsand Profileras shown below: Similar to how you can inspect CSS rules applied to HTML elements, you can inspect the state and props of React components using the developer tools. Click the Componentstab, and inspect one of the two components we created earlier. Below, you can see the props and state of the When you click on the button, the state value will change accordingly. You can inspect the You can control what output is being rendered by a component by implementing conditional rendering in your JSX code. For example, let's say you want to switch between rendering the login and logout buttons, depending on the availability of the You don't need to add an In the example above, React will render the logout button when the When developing with React, there will be cases where you want to render a part of your UI dynamically in a component. In the example below, the JSX element is stored in a variable called Instead of writing two return statements, you store the dynamic UI element inside a variable and use that variable in the This way, you can have a component that has static and dynamic elements. It's possible to render a component only if a certain condition is met and render null otherwise. For example, let's say you want to render a dynamic message for users when they have new emails in their inbox: In this example, the It's also possible to use a ternary operator in order to render the UI dynamically. Take a look at the following example: Instead of using a variable to hold the Under the hood, React has an internal event handler that connects to the native DOM event. This is why we can add the When you call a function in response to events, the When you click on the button above, the The Whenever a DOM event is triggered, that synthetic event will be handled by React so that you can decide what to do with that event. The use case for this Synthetic event is the same as the native DOM event. Three of the most common event handlers you're going to use are: You can respond to user interactions like clicking, hovering, focusing or typing on a form input, submitting a form, and so on. In the previous chapter, you saw how conditional logic can be used to render different outputs. By combining conditional logic with state, props, and event handlers, you can create a dynamic component that renders different outputs based on the data it currently holds. For example, suppose you want to show or hide a First, you create a state to hold the visibility status of the paragraph using the Next, a function named Finally, a By using states, props, and event handlers, the code you write becomes a description of what the user interface should look like. React then takes that description and renders it on the browser. There are 4 common ways you can add CSS in a React application: This chapter will explore these 4 different ways to write CSS in React components, and which one you should use when starting a React application. React components are composed of JSX elements. But just because you're not writing regular HTML elements doesn't mean you can't use the old inline style method. The only difference with JSX is that inline styles must be written as an object instead of a string. See the example below: In the style attribute above, the first set of curly brackets is used to write JavaScript expressions. The second set of curly brackets initializes a JavaScript object. Style property names that have more than one word are written in camelCase instead of using the traditional hyphenated style. For example, the usual Because the style attribute is an object, you can also separate the style by writing it as a constant. This way, you can reuse the style in other elements as needed: If you need to extend your paragraph style further down the line, you can use the spread operator. This will let you add inline styles to your already declared style object. See the JSX inline styles allow you to write CSS directly into your component. One of the benefits of using the inline style approach is that you will have a simple component-focused styling technique. When using an object for styling, you can extend your style by spreading the object. But in a big and complex project where you have hundreds of React components to manage, this might not be the best choice for you. You can't specify pseudo classes using inline styles. That means you can't define rules like Also, you can't specify media queries for responsive styling. Let's consider another way to style your React app. Another way to add CSS in React is to use Let's create a Now, let's import the CSS file into the This way, the CSS will be separated from your JavaScript files, and you can just write CSS syntax as usual. You can even include a CSS framework such as Bootstrap in React with this approach. All you need to do is import the CSS file in your root component. This method will enable you to use all CSS features, including pseudo classes and media queries. A CSS module is a regular CSS file with all of its class and animation names scoped locally by default. When applying this method, each React component will have its own CSS file, and you need to import that CSS file into your component. To let React know you're using CSS modules, name your CSS file using the Here's an example: Then import it to your component file: When you build your app, Vite will automatically look for CSS files that have the Using CSS Modules ensures that your CSS classes are scoped locally, preventing CSS rules from colliding with each other. Another advantage of using CSS Modules is that you can compose a new class by inheriting from other classes that you've written. This way, you'll be able to reuse CSS code that you've written previously, like this: But we're not going to explore every single feature of CSS modules here, only enough to get you familiar with them. Tailwind CSS is a modern utility-first CSS framework that allows you to style elements by combining a bunch of classes together. CSS frameworks like Bootstrap and Bulma provide you with high-level components that you can immediately use in your project. When you need to style a button, you just need to apply the classes that contain the desired CSS properties: When using Bootstrap, the On the other hand, Tailwind gives you utility classes where each class has only one or two properties: In the example above, the It depends on the method you feel comfortable with the most. If you're working with a team, you need to discuss and agree on the method you want to apply, because mixing the styles makes it hard to develop and maintain the application. Remember: Always use only one way to style React components in a specific project to avoid confusion. One of the most common interfaces you're going to build as a web developer is a form. In React, you can create a form by using state as the single source of that form's data. In this chapter, I will show you how to handle form input, form submission, and form validation using React. For example, suppose you want to create a form with a single text input and a button. You can first set up the state that will serve as the input value: Next, add the Next, add the The Now whenever the input value changes, the state will be updated to reflect the changes. The next step is to submit the form. Let's create a function that handles the submit event called Here, the The function then gets passed to the To handle form validation, you need to create another state that will store the error message. You can name this state Next, create a Inside this function, you can call the For example, suppose the Now that you have some validation logic, you need to set the Also, add a paragraph below the Inside the This way, the form won't be submitted until the error is fixed. Here's the full source code of the form if you want to try it: A form can be as complex or as simple as required, but you'll use the pattern you see here no matter what form you build: Using these building blocks, you can build any form required by your application. Modern web applications tend to have a modular architecture, where the back end is separated from the front end. The front end app will need to send an HTTP network request to a remote endpoint. React doesn't tell you how you should send network requests. The library only focuses on rendering UI with data management using props and states. To fetch data using React, you can use any valid JavaScript library like Axios, Superagent, and even the native Fetch API. In this chapter, we're going to see how to do network requests using Fetch in React. When you create a React application that needs to synchronize with a system outside of React, you need to use the This hook allows you to run some code after rendering so that you can synchronize your component with some system outside of React. When the hook has finished performing the data request, you can set the response into your component states and render the appropriate components based on the state values. To show you an example, let's fetch data from https://jsonplaceholder.typicode.com/todos/1 which is a dummy end point: In the code above, we create an When a response is received, we parse the JSON string into a JavaScript object, log the object, and then set the The response is as follows: Here, you can see that the If you remove the The When you want to run By using the Congratulations on finishing this handbook! I hope you found it useful and now feel that learning React is not impossible or confusing at all. All you need is a step-by-step guide that reveals the key concepts of React one by one. If you're eager to dive deeper into React and expand your skills, I encourage you to check out my new book called Beginning Reacthere: The goal of this book is to help you see how to build an application using React. There are two projects included in this book that will give you the "experience" of building a web application using React. You will see how React concepts like components, JSX, props, states, hooks, and Context API are used to create a dynamic front-end application. Here's my promise: You will actually feel confident building web applications from scratch using React. Thanks for reading!Requirements
Chapter 1: Introduction
Computer Setup
How to install Visual Studio Code
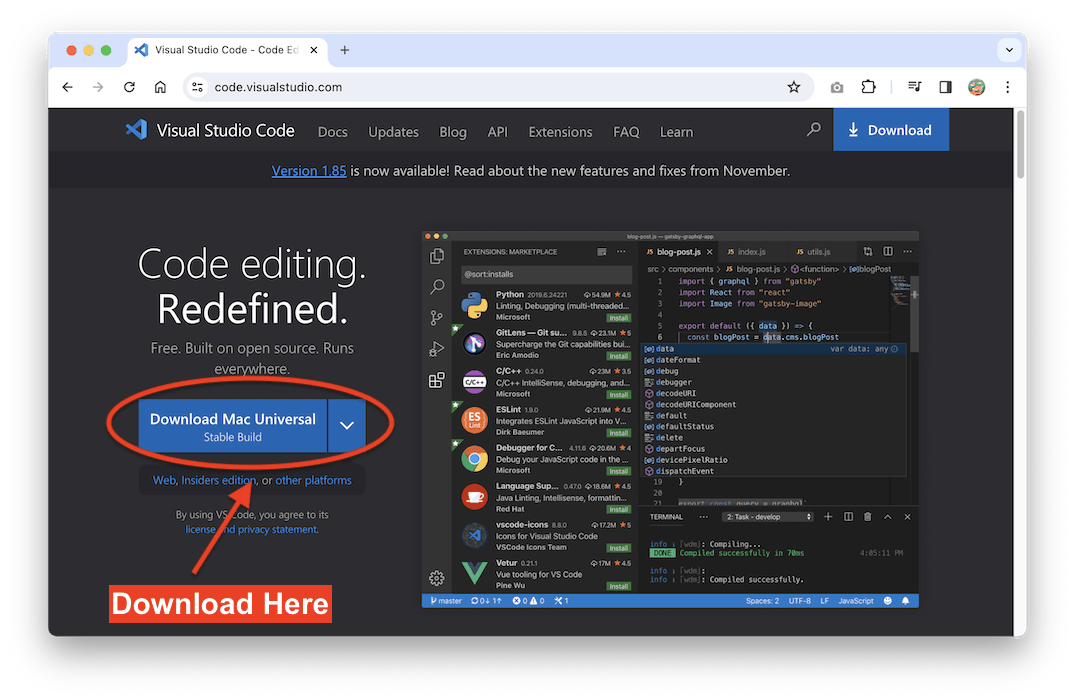 Downloading Visual Studio Code
How to install Node.js
node -vYour First React Application
npm create [email protected] my-react-app -- --template reactNeed to install the following packages: [email protected] to proceed? (y) yScaffolding project in /dev/beginning_react/my-react-app...Done. Now run: cd my-react-app npm install npm run devcdcommand to change the working directory to the application you've just created, and then run npm installto install the packages required by the application.npm run devcommand to start your application:$ npm run dev> [email protected] dev> vite VITE v5.0.10 ready in 509 ms ➜ Local: http://localhost:5173/ ➜ Network: use --host to expose ➜ press h + enter to show help Vite-React Home Page
Explaining the Source Code
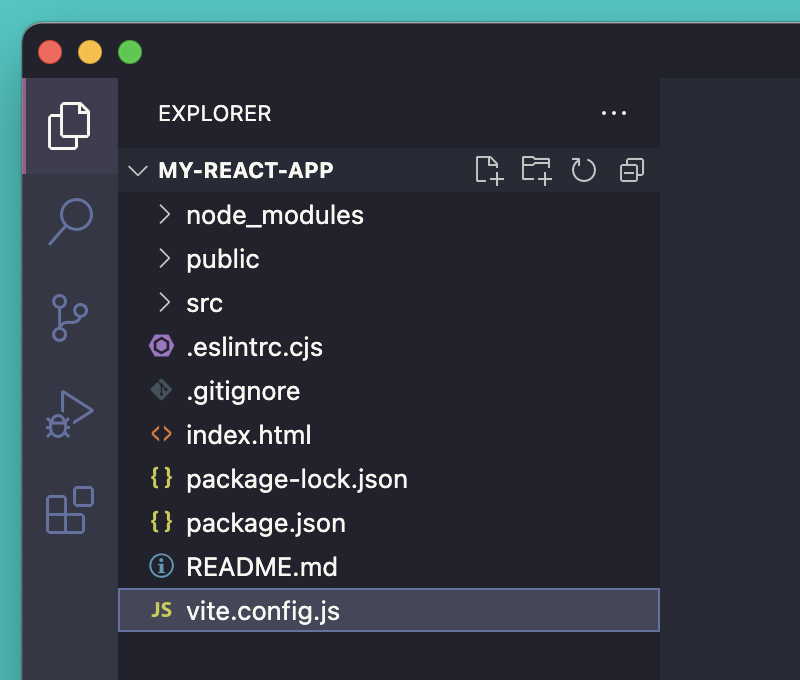 Vite-React Application Structure
vite.config.jsis a configuration file that instructs Vite on how to run the application. Because we have a React application, you'll see the React plugin imported inside:import { defineConfig } from 'vite'import react from '@vitejs/plugin-react'// https://vitejs.dev/config/export default defineConfig({ plugins: [react()],})npm run devcommand, Vite will look into this file to know how to run the program.package.jsonfile stores the information about the project, including the packages required to run the project without any issues. The package-lock.jsonfile keeps track of the installed package versions..eslintrc.cjsfile contains ESLint rules. ESLint is a code analysis tool that can identify problematic code in your project without needing to run the project. It will report any errors and warnings in VSCode.index.htmlfile is a static HTML document that's going to be used when running the React application, and the README.mdfile contains an introduction to the project.src/folder where the React application code is written.src├── App.css├── App.jsx├── assets│ └── react.svg├── index.css└── main.jsxApp.cssfile contains the CSS rules applied to the App.jsxfile, which is the main React application code.assets/folder contains the assets required for this project. In this case, it's the React icon, which you had seen in the browser.index.cssfile is the root CSS file applied globally to the application, and the main.jsxfile is the root file that access the index.htmlfile to render the React application. Here's the content of main.jsxfile:import React from 'react'import ReactDOM from 'react-dom/client'import App from './App.jsx'import './index.css'ReactDOM.createRoot(document.getElementById('root')).render( <React.StrictMode> <App /> </React.StrictMode>,)<div>element that contains the rootID, then renders the whole React application to that element.App.jsxfile to view the React code:import { useState } from 'react'import reactLogo from './assets/react.svg'import viteLogo from '/vite.svg'import './App.css'function App() { const [count, setCount] = useState(0) return ( <> <div> <a href="https://vitejs.dev" target="_blank"> <img src={ viteLogo} className="logo" alt="Vite logo" /> </a> <a href="https://react.dev" target="_blank"> <img src={ reactLogo} className="logo react" alt="React logo" /> </a> </div> <h1>Vite + React</h1> <div className="card"> <button onClick={ () => setCount((count) => count + 1)}> count is { count} </button> <p> Edit <code>src/App.jsx</code> and save to test HMR </p> </div> <p className="read-the-docs"> Click on the Vite and React logos to learn more </p> </> )}export default AppAppis defined. The Vite and React logos are rendered with a link to the respective library, and there's a counter button that will increment the counter by 1 when you click on it.Appcomponent that renders a <h1>element:function App() { return <h1>Hello World</h1>}export default Appindex.css, app.css, and assets/folder. You also need to delete the import './index.css'statement in your main.jsxfile. React Output From Code Changes
Chapter 2: How to Create React Components
Appcomponent that returns a heading element:function App() { return <h1>Hello World</h1>}export default Appnullor falseinstead of an element.function App() { return null}.jsxfile extension. As you can see in this project, you have main.jsxand App.jsx.How to Return Multiple Elements With Fragments
<div>:function App() { return ( <div> <h1>Hello World!</h1> <h2>Learning to code with React</h2> </div> )}export default App<div>element in the browser. To avoid cluttering your application, you can render an empty tag <>like this:function App() { return ( <> <h1>Hello World!</h1> <h2>Learning to code with React</h2> </> )}export default AppFragmentmodule from React to make it explicit as follows:import { Fragment } from 'react';function App() { return ( <Fragment> <h1>Hello World!</h1> <h2>Learning to code with React</h2> </Fragment> )}export default AppFragmenttag. Using an empty tag <>is enough.How to Render to the Screen
main.jsxfile.<div>is enough, as you can see in the index.htmlfile:<body> <div id="root"></div> <script type="module" src="/src/main.jsx"></script></body><div>element. react-dompackage, and the document.getElementById('root')is used to select the <div>element below:import React from 'react'import ReactDOM from 'react-dom/client'function App() { return <h1>Hello World!</h1>}ReactDOM.createRoot(document.getElementById('root')).render( <React.StrictMode> <App /> </React.StrictMode>,)Appcomponent is placed in the same file as the ReactDOM library. You can do this if you want to remove the App.jsxfile, so you have only a single main.jsxfile as the source for your React application.How to Write Comments in React
//to comment any code.exportstatement:function App() { return ( <> <h1>Hello World!</h1> <h2>Learning to code with React</h2> </> )}// export default Appreturnstatement, you need to use the curly brackets, forward slash, and asterisk format { /* comment here */}as shown below:function App() { return ( <> <h1>Hello World!</h1> { /* <h2>Learning to code with React</h2> */} </> )}CTRL + /for Windows/ Linux or Command + /for macOS.How to Compose Multiple Components as One
Appcomponent to the browser. But applications built using React can be composed of tens or hundreds of components.export default function ParentComponent() { return ( <> <UserComponent /> <ProfileComponent /> <FeedComponent /> </> );}function UserComponent() { return <h1> User Component </h1>;}function ProfileComponent() { return <h1> Profile Component </h1>;}function FeedComponent() { return <h1> Feed Component</h1>;}<ParentComponent>renders three children components:<UserComponent><ProfileComponent><FeedComponent>ReactDOM.render()method: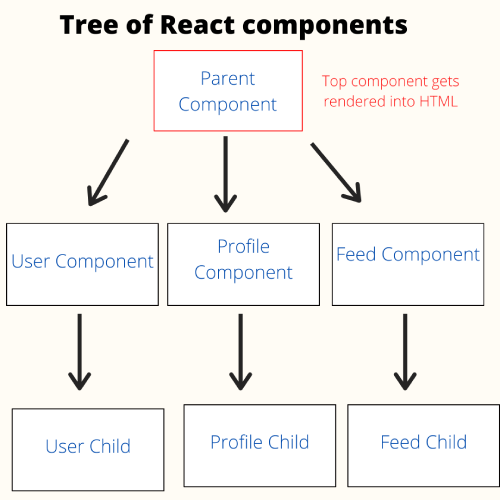 React Component Tree Illustrated
Chapter 3: Making Sense of JSX
returnstatement that contains elements to render on the screen:function App() { return <h1>Hello World</h1>}<h1>looks like a regular HTML tag, but it's actually a special template language included in React called JSX.function App() { const myElement = <h1>Hello World</h1> return myElement}{ }:const lowercaseClass = 'text-lowercase';const text = 'Hello World!';const App = <h1 className={ lowercaseClass}>{ text}</h1>;How to Render a List Using JSX
const users = [ { id: 1, name: 'Nathan', role: 'Web Developer' }, { id: 2, name: 'John', role: 'Web Designer' }, { id: 3, name: 'Jane', role: 'Team Leader' },]map()function to loop over the array:function App() { const users = [ { id: 1, name: 'Nathan', role: 'Web Developer' }, { id: 2, name: 'John', role: 'Web Designer' }, { id: 3, name: 'Jane', role: 'Team Leader' }, ] return ( <> <p>The currently active users list:</p> <ul> { users.map(function(user){ // returns Nathan, then John, then Jane return ( <li> { user.name} as the { user.role} </li> ) }) } </ul> </> )}map()function in a variable. The example above will return a <li>element for each array value into the component.map()function):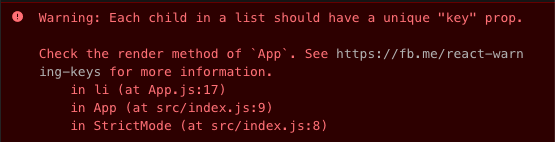 React 'key' Warning on Browser Console
keyprop is a special prop that React will use to determine which child element has been changed, added, or removed from the list.user.iddata. Here's how you pass a keyprop for each <li>element:return ( <li key={ user.id}> { user.name} as the { user.role} </li>)indexvalue as the last resort:users.map(function(user, index){ return ( <li key={ index}> { user.name} as the { user.role} </li> )})How to Add the Class Attribute
classattribute to your elements by using the classNamekeyword:function App() { return <h1 className='text-lowercase'>Hello World!</h1>}classis reserved for JavaScript classes, so you need to use classNameinstead.Chapter 4: Props and States
ParentComponentthat renders a ChildComponentlike this:function ParentComponent() { return <ChildComponent />}ParentComponentinto ChildComponentby adding a new attribute after the component name.nameprop with the value 'John' is passed to the ChildComponent:function ParentComponent() { return <ChildComponent name='John' />}ChildComponentwill receive the name prop into the component.propsobject by defining it in the function component's argument:function ChildComponent(props){ return <p>Hello World! my name is { props.name}</p>}propsparameter will always be an object, and any prop you define when rendering the component will be passed as a property to the object.How to Pass Down Multiple Props
function ParentComponent() { return ( <ChildComponent name="John" age={ 29} hobbies={ ["read books", "drink coffee"]} occupation="Software Engineer" /> )}propsparameter.function ParentComponent() { function greetings() { return 'Hello World' } return <ChildComponent greetings={ greetings} />}function ChildComponent(props) { return <p>{ props.greetings()}</p>}Props are Immutable
ChildComponenttries to change the value of props.nameproperty:function ChildComponent(props){ props.name = 'Mark'; return <p>Hello World! my name is { props.name}</p>}function ParentComponent() { return <ChildComponent name='John'/>}export default ParentComponentUncaught TypeError: Cannot assign to read only property 'name' of object '#<Object>'State in React
useStatehook as shown below:import { useState } from 'react'function ParentComponent() { const [name, setName] = useState('John')}export default ParentComponentuseStatehook is a function that enables you to put value into the state mechanism.useState()function, you can pass an argument that will serve as the initial value of the state. The function then returns an array with two elements.useState, but it's recommended to use [something, setSomething].function ParentComponent() { const [name, setName] = useState('John') return <h1>Hello { name}</h1>}namevariable, you need to use the provided setName()function.setName()in the component's body, because React will refresh itself anytime you change the state value.function ParentComponent() { const [name, setName] = useState('John') return ( <> <h1>Hello { name}</h1> <button onClick={ () => setName('Mark')}>Change Name</button> </> )}<button>element and add the onClickprop, which gets executed anytime we click on the button.setName()function, changing the state value.How to Pass State to a Child Component
setSomethingfunction received from the useStatehook.ParentComponentto ChildComponent:function ParentComponent() { const [name, setName] = useState('John') return <ChildComponent name={ name} setName={ setName} />}ChildComponent, you can call the setName()function from propslike this:function ChildComponent(props) { return ( <> <h1>Hello { props.name}</h1> <button onClick={ () => props.setName('Mark')}>Change Name</button> </> )}ChildComponentis clicked, the value of the namestate will change. Internally, React will refresh the application and reflect the changes in the user interface.How to Use React DevTools to Inspect States and Props
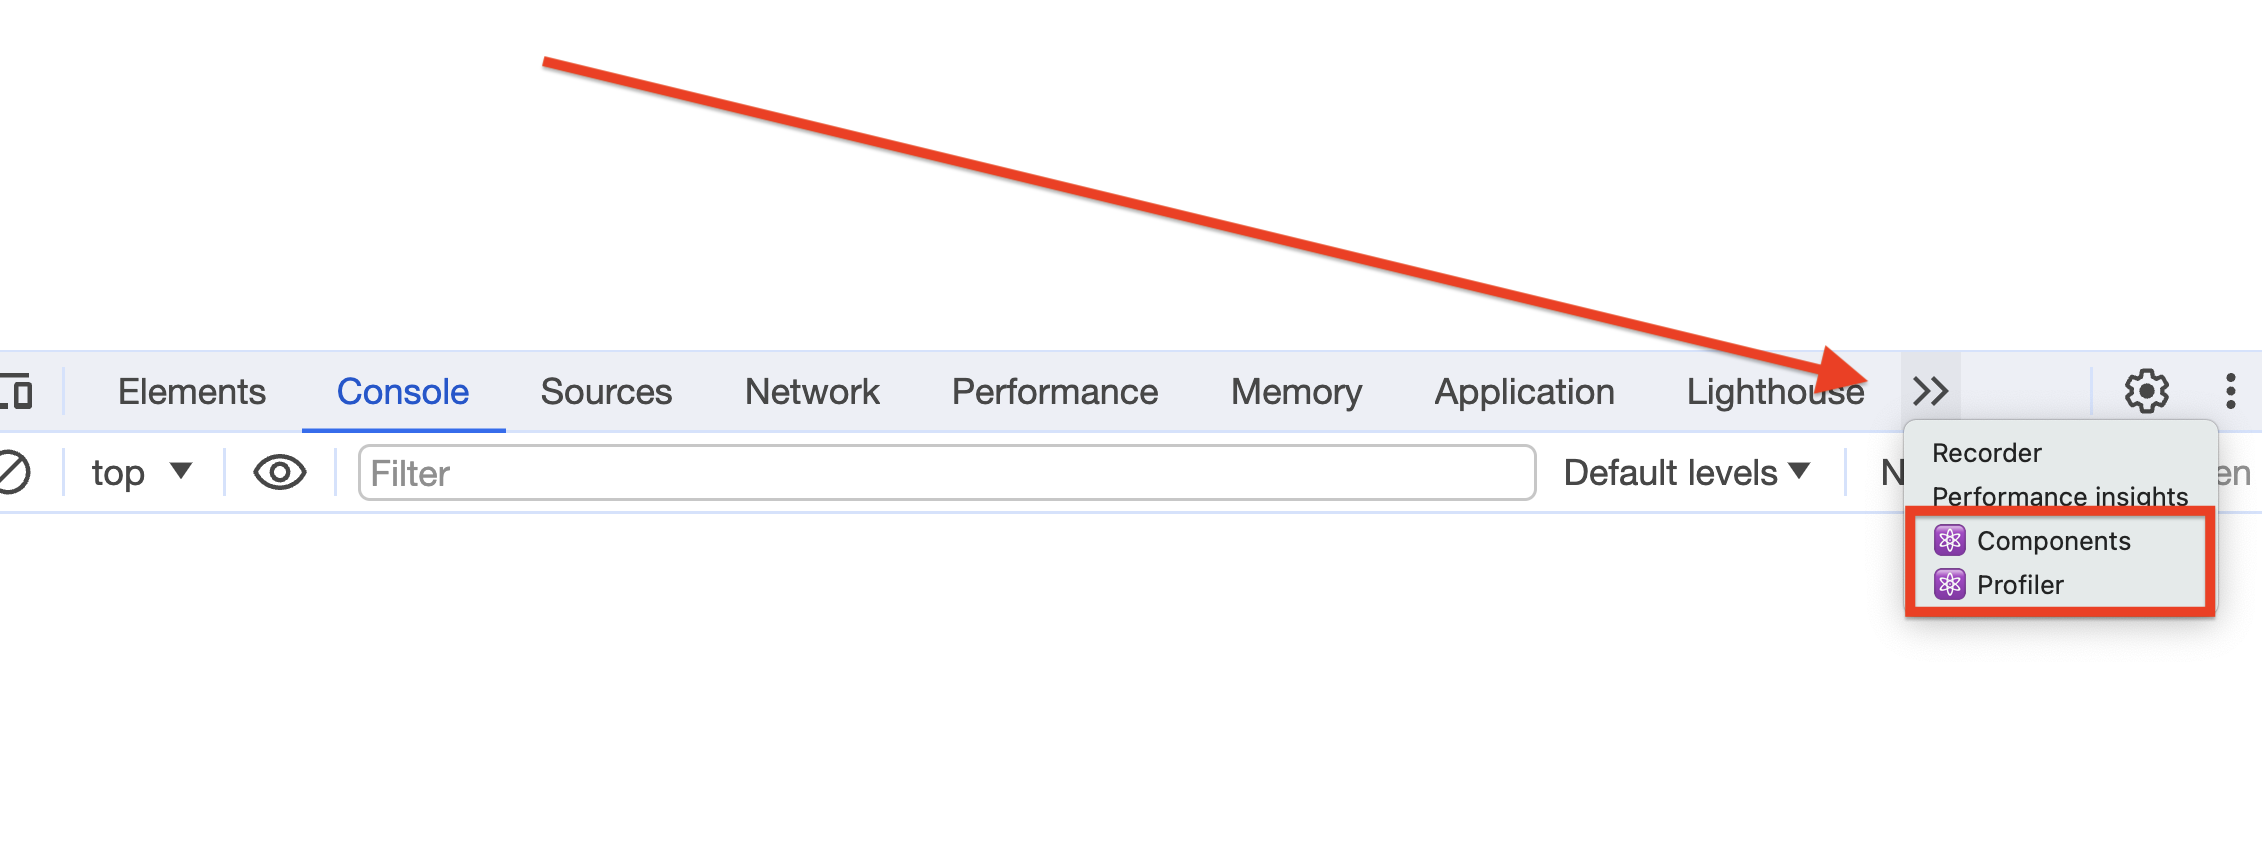 Opening React DevTool
ParentComponent, as well as other details: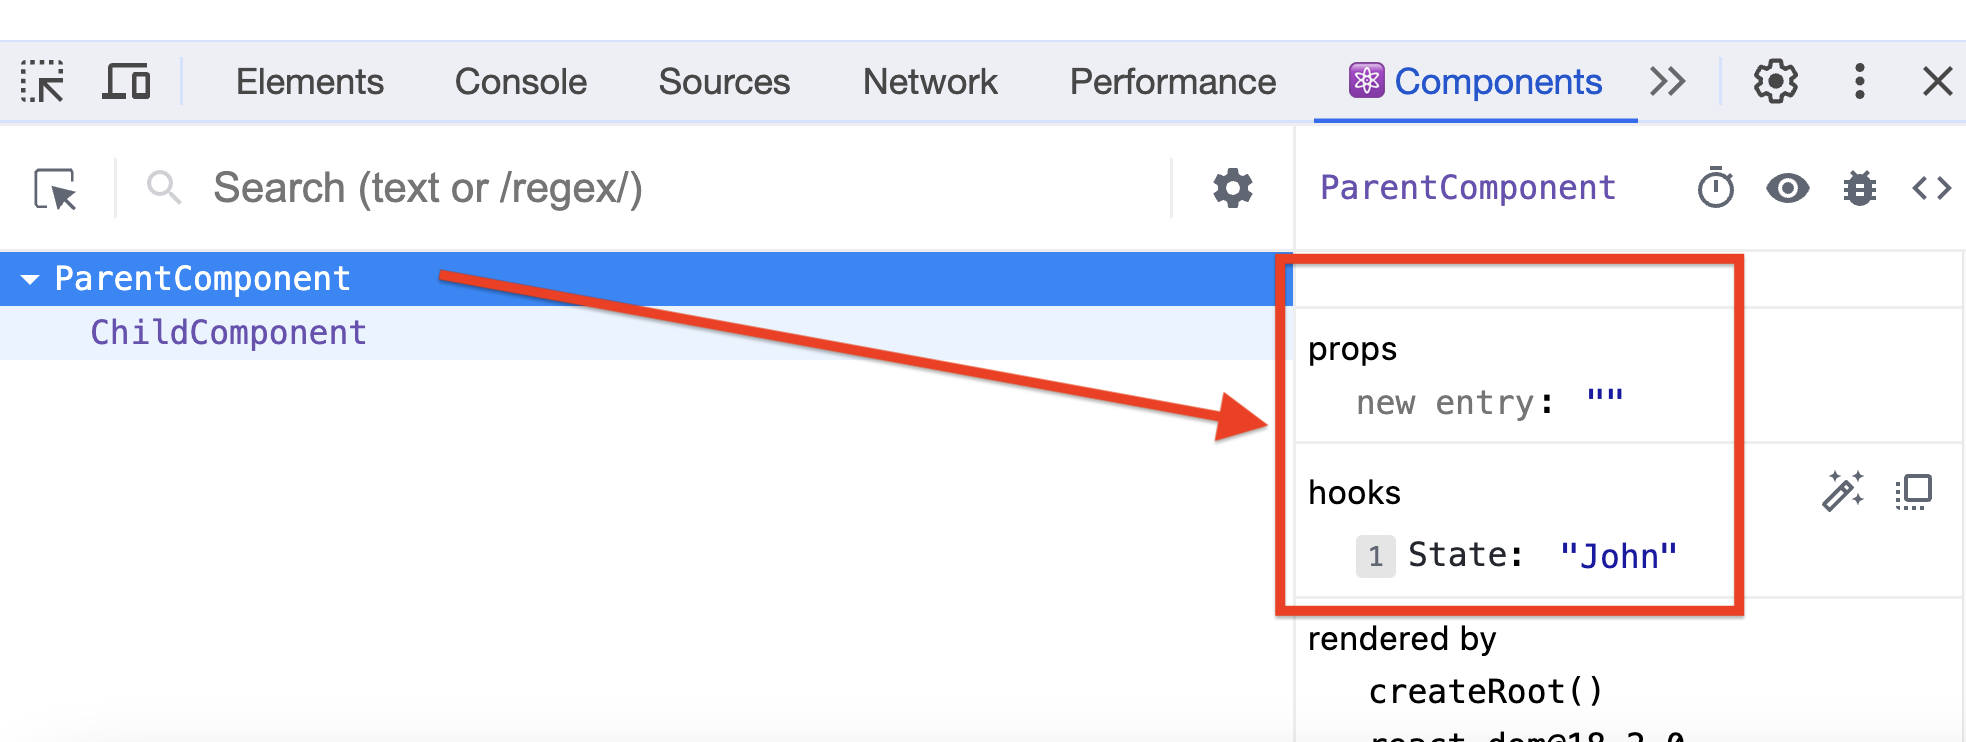 Inspecting Components With React DevTool
ChildComponentto view its details. These DevTools will come in handy when you develop React applications.Chapter 5: React Conditional Rendering
userstate:function App(props) { const { user } = props if (user) { return <button>Logout</button> } return <button>Login</button>}export default Appelsestatement in the component because React will stop further processes once it reaches a returnstatement.uservalue is truthy, and the login button when useris falsy.Partial Rendering with a Regular Variable
button, and that variable is used again in the returnstatement:function App(props) { const { user } = props let button = <button>Login</button> if (user) { button = <button>Logout</button> } return ( <> <h1>Hello there!</h1> { button} </> )}returnstatement.Inline Rendering with the
&&Operatorfunction App() { const newEmails = 2 return ( <> <h1>Hello there!</h1> { newEmails > 0 && <h2> You have { newEmails} new emails in your inbox. </h2> } </> )}<h2>element only gets rendered when the newEmailscount is greater than 0.Inline Rendering with the Conditional (Ternary) Operator
function App(props) { const { user } = props return ( <> <h1>Hello there!</h1> { user? <button>Logout</button> : <button>Login</button> } </> )}<button>element, you can simply use the ternary operator on the uservalue and render 'Logout' or 'Login' button according to the variable's value.Chapter 6: How to Handle User Events
onClickprop to buttons in the previous chapters, which gets executed in response to a click event.eventobject will be passed to the callback function as follows:function App() { const handleClick = (event) => { console.log("Hello World!"); console.log(event); } return ( <button onClick={ handleClick}> Click me </button> )}eventvariable will be logged as a SyntheticBaseEventobject in your console: React's SyntheticBaseEvent Log
SyntheticBaseEventobject is a built-in React object used to interact with the native DOM events. Different browsers have different implementations of the DOM event object, so the SyntheticBaseEventmakes React compatible with these browsers.onChangeonClickonSubmitHow to Change the UI By Handling Events
<div>element with a button click. Here's how you do it:import { useState } from 'react';function App() { // State to hold the visibility status of the paragraph const [isParagraphVisible, setIsParagraphVisible] = useState(true); // Function to toggle the visibility status of the paragraph const toggleStatus = () => { setIsParagraphVisible(!isParagraphVisible); }; return ( <> <h1>Change UI based on click</h1> { isParagraphVisible && ( <p>This paragraph will be shown/hidden on click</p> )} <button onClick={ toggleStatus}> { isParagraphVisible ? 'Hide' : 'Show'} Paragraph </button> </> );}export default App;useStatehook. The default value of the state is true.toogleStatus()is defined. This function will change the statusvalue from trueto falseand vice versa.returnstatement is added to render the elements to the screen. When the button is clicked, the toogleStatus()function will be executed. This will show or hide the paragraph depending on the current status.Chapter 7: CSS in React
React Inline Styling
function App() { return ( <h1 style={ { color: 'red' }}>Hello World</h1> );}text-alignproperty is written as textAlignin JSX:function App() { return ( <h1 style={ { textAlign: 'center' }}>Hello World</h1> );}const pStyle = { fontSize: '16px', color: 'blue'}export default function App() { return ( <> <p style={ pStyle}>Hello World!</p> <p style={ pStyle}>The weather is sunny today.</p> </> )}<p>element below:const pStyle = { fontSize: '16px', color: 'blue'}export default function App() { return ( <p style={ { ...pStyle, color: 'green', textAlign: 'right' }}> When you go to work, bring your umbrella with you! </p> )}:hover, :focus, :active, and so on.CSS Files
.cssfiles. Vite already knows how to handle a .cssfile, so all you need to do is import the CSS file into your JSX file and add the right classNameprop to your component.style.cssfile in your project folder with the following content:/* style.css */.paragraph-text { font-size: 16px; color: #ff0000;}App.jsxfile and add the class prop to the component:import './style.css';function App() { return ( <p className="paragraph-text"> The weather is sunny today. </p> );}CSS Modules
[name].module.cssconvention./* App.module.css */.BlueParagraph { color: blue; text-align: left;}.GreenParagraph { color: green; text-align: right;}import styles from "./App.module.css";function App() { return ( <> <p className={ styles.BlueParagraph}> The weather is sunny today. </p> <p className={ styles.GreenParagraph}> Still, don't forget to bring your umbrella! </p> </> )}.module.cssname and process the class names to a new localized name..MediumParagraph { font-size: 20px;}.BlueParagraph { composes: MediumParagraph; color: blue; text-align: left;}.GreenParagraph { composes: MediumParagraph; color: green; text-align: right;}Tailwind CSS
<button className="btn btn-primary">Subscribe</button>btnclass provides a combination of CSS properties such as padding, color, opacity, font weight, and so on.<button className='px-5 py-2 text-white bg-blue-500 border-2'> Subscribe</button>px-5is short for padding padding-leftand padding-right, while 5 is a specific size for the paddings. The text-whiteapplies color: white, the bg-blue-500applies the background-colorproperty, and borderapplies border-width.Which One Should You Use?
Chapter 8: How to Build Forms in React
How to Handle Form Input
import { useState } from 'react';function Form() { const [username, setUsername] = useState();}returnstatement and define the form. On the <input>element, assign the usernamestate as the valueprop:import { useState } from 'react';function Form() { const [username, setUsername] = useState(); return ( <form> Username: <input type='text' name='username' value={ username} /> </form> );}onChangeprop to the <input>element. In that prop, assign the valueof the text input as the value of the usernamestate:import { useState } from 'react';function Form() { const [username, setUsername] = useState(); return ( <form> Username: <input type='text' value={ username} onChange={ e => setUsername(e.target.value)} /> </form> );}eor eventobject is passed by the onChangeprop to the callback function. From that object, we can get the value of the text input at event.target.valueproperty.How to Handle Form Submission
handleSubmit()as follows:import { useState } from 'react';function Form() { const [username, setUsername] = useState(); const handleSubmit = (e) => { e.preventDefault(); alert(username); } return ( <form onSubmit={ handleSubmit}> Username: <input type='text' value={ username} onChange={ (e) => setUsername(e.target.value)} /> <button>Submit</button> </form> );}handleSubmit()function will stop the default form submission behavior, which will trigger a refresh, and then create an alert box to display the usernamevalue.onSubmitprop of the <form>element. A <button>is also added so that the user can submit the form.How to Handle Form Validation
usernameErroras follows:const [usernameError, setUsernameError] = useState();handleUsername()function that will run when the usernameinput changes.setUsername()function to update the state, and then write logic to validate the input value.usernamelength must be longer than 6. Here's how you do it:const handleUsername = e => { const { value } = e.target; setUsername(value); // Validate username value: if (value.length <= 6) { setUsernameError('Username length must be more than 6 characters'); } else { setUsernameError(); }};handleUsername()function as the onChangeprop handler.<input>element that will show the error message as follows:return ( <form onSubmit={ handleSubmit}> Username: <input type='text' value={ username} onChange={ handleUsername} /> <p>{ usernameError}</p> <button>Submit</button> </form>);handleSubmit()function, you can check if there's an error on the form by checking the usernameErrorstate, then prevent the form from being submitted when there is an error:const handleSubmit = (e) => { e.preventDefault(); if(usernameError){ alert('Unable to submit: Form contain errors'); } else { alert(username); }}import { useState } from 'react';function App() { const [username, setUsername] = useState(); const [usernameError, setUsernameError] = useState(); const handleSubmit = (e) => { e.preventDefault(); if(usernameError){ alert('Unable to submit: Form contain errors'); } else { alert(username); } } const handleUsername = e => { const { value } = e.target; setUsername(value); // Validate username value: if (value.length <= 6) { setUsernameError('Username length must be more than 6 characters'); } else { setUsernameError(); } }; return ( <form onSubmit={ handleSubmit}> Username: <input type='text' value={ username} onChange={ handleUsername} /> <p>{ usernameError}</p> <button>Submit</button> </form> );}export default App;onChangeprop as a way to update the statehandleSubmit()function is executed when the form is submittedChapter 9: Network Requests in React
The useEffect Hook
useEffecthook.function App() { const [title, setTitle] = useState(''); useEffect(() => { getData(); }, []); const getData = async () => { const response = await fetch('https://jsonplaceholder.typicode.com/todos/1'); const task = await response.json(); console.log(task) setTitle(task.title); }; return <h1>{ title}</h1>;}Appcomponent that has a state called title, and we run the Fetch API to get a todo task from the API.titlestate to the task.titleproperty value.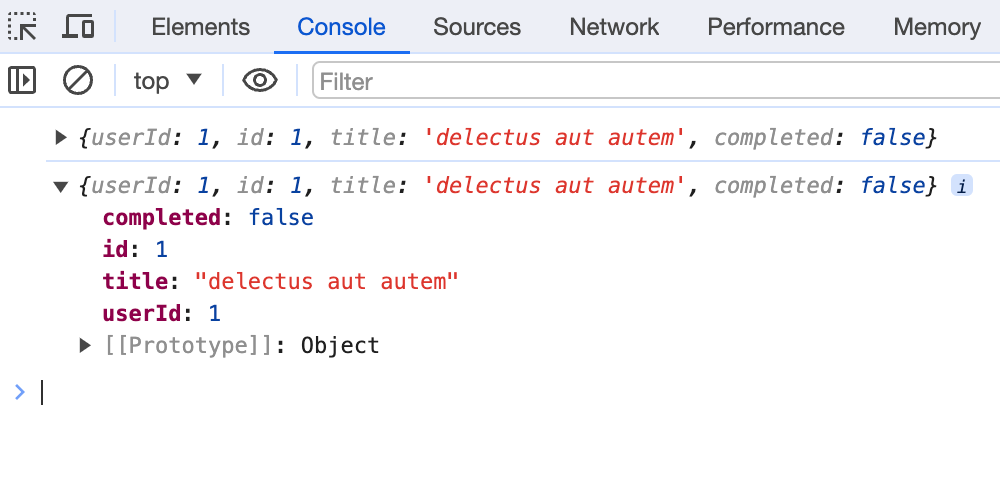 React useEffect Log
console.log()is called twice. This is because the <React.StrictMode>wrapper always runs a useEffecthook twice to help you in development.<React.StrictMode>wrapper in main.jsx, the useEffecthook will run only once.useEffecthook itself is a function that accepts two arguments:useEffectwill be skipped if none of the variables are updated.useEffectonly once, you can pass an empty array as the second argument to the function, as shown in the example above.useEffecthook, React can send HTTP requests and fetch data from any external system, then store that data in the component state.Wrapping Up

Related Articles
-
Tuchel praises 'all-in' Kane and 'team player' Bellingham after Croatia win
-
Humans may have hidden regenerative powers
-
New study maps the peanut genome in its entirety
-
Oman Launches Mandatory National Bitcoin Mining Pool in State-Backed Push for Regulatory Control
-
Law intended to allow people work until 66th birthday to come into effect on June 29th
-
XRP Price Is Targeting $1,000 Says Ex Goldman Analyst
- Latest Articles
-
- Law intended to allow people work until 66th birthday to come into effect on June 29th
- Bellingham brilliance & Kane brace get England up & running
- ‘AI is going to create a labor shortage’: Jeff Bezos sees more jobs being created in the new economy, not less
- A glob and a stellar nursery
- Assassin's Creed Shadows' final content update brings new story tying directly into Black Flag Resynced, but it's bigger than that
- Deutsche Bank and the Smart Money are at War Over Micron (MU) Stock
- No young women have died of cervical cancer in England for years
- The best math lesson for children might be happening at your kitchen table, shows study
- Deutsche Bank and the Smart Money are at War Over Micron (MU) Stock
- Smashing Security podcast #472: AI gets hacked, and BitLocker gets bypassed
- Random Reads
-
- Dépendance, risques, quantité recommandée: tout ce qu'il faut savoir sur le sucre
- Fans boo, players adapt - the view on World Cup hydration breaks
- Crypto market treads thin ice following Warsh FOMC, Trump Iran comments
- Gaming groups urge Congress to ban prediction markets sports betting in CLARITY Act
- Tornadoes reported in Illinois, Iowa as severe weather roils Midwest
- Scientists discover spider that disguises itself as a parasitic fungus
- Luigi Mangione will assert psychiatric defense in murder case in UnitedHealthcare CEO’s killing
- Backed by Threat of Clawbacks, Feds Wield Tight Grip on $50B Rural Health Fund
- iPhone Air With Dual Lens Camera Coming in Spring 2027
- Trump and Iran's President Pezeshkian sign memorandum aimed to end war
- In agentic commerce, the agent won’t ask—it will judge
- No young women have died of cervical cancer in England for years
- Amazon’s Got A Great Early Prime Day Deal On The Middle-Earth 6-Film Collection
- Luis Diaz scores goal and provides assist in Colombia’s World Cup opener against Uzbekistan
- ‘Dancing With the Stars’ Season 35 Cast: All the Stars Hitting the Ballroom This Fall
- RFK Jr. presents $700 million in mental health funding, but experts say grants aren’t new
- City legend Bernardo can have Modric-like impact on Madrid
- Psychologists Say Patients Are Bringing AI Into Therapy Sessions: Survey
- Luis Diaz scores goal and provides assist in Colombia’s World Cup opener against Uzbekistan
- Early-Onset Cancers Are on the Rise. Knowing Your Family History Is Crucial.
- Search
-
- Links
-
- View / Democrats start forging a post-Trump and post-Biden foreign policy
- Russian authorities detain suspect over St. Petersburg cafe blast
- Air defenses shoot down six more drones flying toward Moscow
- Russian authorities detain suspect over St. Petersburg cafe blast
- 'Top Gear' star Jeremy Clarkson reveals 'aggressive' cancer diagnosis after health scares
- ¡Doblete del capitán! Harry Kane aparece de cabeza y amplía la ventaja de Inglaterra
- Lula warns Trump against meddling in Brazil election after criticism of judiciary
- View / Anthropic takes the path of most resistance
- Trump signs memorandum of understanding with Iran (VIDEO)
- Today's Big Question